Little Debbie Christmas Tree Cake Cheesecake – A Festive No-Bake Showstopper
If your holiday sweet tooth perks up at the sight of those nostalgic Little Debbie Christmas Tree Cakes, this dessert will feel like a warm hug. It’s a playful no-bake cheesecake that layers creamy filling with those iconic frosted snack cakes. The result is part childhood memory, part grown-up dessert, and completely delicious.
5 Irresistible Desserts, Completely Free
Get five easy dessert recipes you’ll want to save, share, and make again and again—delivered straight to your inbox.
No oven, no stress, and a whole lot of holiday cheer in every slice.

Little Debbie Christmas Tree Cake Cheesecake - A Festive No-Bake Showstopper
Ingredients
Method
- Prep your pan. Line the bottom of a 9-inch springform pan with parchment paper. Lightly grease the sides for easier release.
- Make the crust. Stir together crushed wafers, melted butter, sugar, and salt until the crumbs look like wet sand. Press firmly into the bottom of the pan using the bottom of a measuring cup. Chill while you make the filling.
- Beat the cream cheese. In a large bowl, beat the softened cream cheese until completely smooth and fluffy, about 2 minutes. Scrape the bowl well.
- Add sweetness and flavor. Beat in powdered sugar, vanilla, and almond extract until smooth and silky. Scrape the bowl again.
- Whip the cream. In a separate, cold bowl, whip the heavy cream to stiff peaks. Do not overbeat. You want a sturdy, cloud-like texture.
- Lighten the filling. Gently fold the whipped cream into the cream cheese mixture in two additions. Use a spatula and light strokes to keep it airy.
- Fold in the cakes. Stir in the chopped Christmas Tree Cakes until evenly distributed. Don’t overmix; you want small chunks throughout for texture.
- Layer it up. Spread half the filling over the crust. Add a layer of whole or halved Christmas Tree Cakes, fitting them snugly. Top with the remaining filling and smooth the surface.
- Chill to set. Cover and refrigerate for at least 6 hours, preferably overnight. The longer chill helps the cheesecake slice cleanly.
- Garnish. Run a thin knife around the pan and release the springform. Top with extra Christmas Tree Cakes, piped whipped cream, and a dusting of green sugar or red gel accents for a festive finish.
- Slice and serve. Use a warm, dry knife for neat slices. Wipe between cuts for the cleanest look.
What Makes This Special
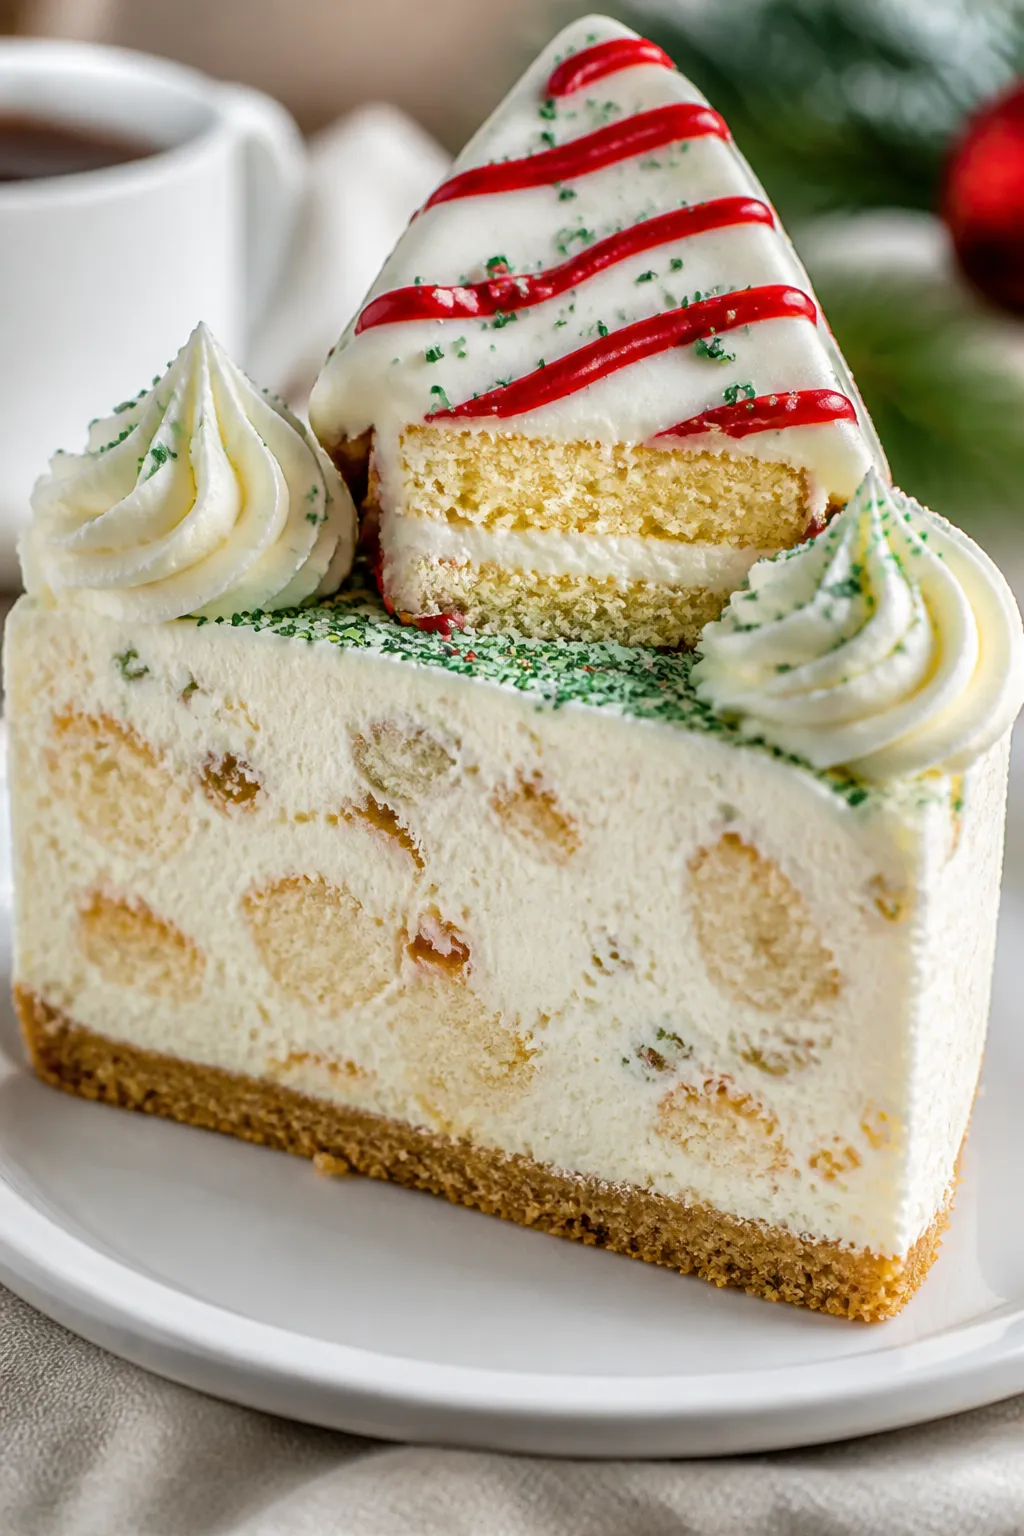
This cheesecake lets the Christmas Tree Cakes do the heavy lifting—flavor, texture, and charm. The cakes add vanilla snack-cake goodness with a hint of that classic green sugar crunch. The cheesecake filling stays light and fluffy, so the whole dessert doesn’t feel heavy.
It’s also a crowd-pleaser: instantly recognizable, easy to slice, and a guaranteed conversation starter.
Best of all, it’s no-bake. You can make it the day before your gathering, clear some space in the fridge, and pull it out when you’re ready to wow your guests. Holiday hosting, simplified.
Ingredients
- For the crust:
- 2 cups crushed vanilla wafer cookies (or graham crackers)
- 6 tablespoons unsalted butter, melted
- 2 tablespoons granulated sugar
- Pinch of salt
- For the filling:
- 24 ounces cream cheese, softened to room temperature
- 3/4 cup powdered sugar
- 1 teaspoon pure vanilla extract
- 1/2 teaspoon almond extract (optional but lovely)
- 1 cup heavy whipping cream, cold
- 5–6 Little Debbie Christmas Tree Cakes, chopped
- For assembly and garnish:
- 3–4 additional Christmas Tree Cakes (for layering and topping)
- Red icing or gel and green sugar sprinkles (optional)
- Whipped cream for the edges (optional)
Instructions

- Prep your pan. Line the bottom of a 9-inch springform pan with parchment paper.
Lightly grease the sides for easier release.
- Make the crust. Stir together crushed wafers, melted butter, sugar, and salt until the crumbs look like wet sand. Press firmly into the bottom of the pan using the bottom of a measuring cup. Chill while you make the filling.
- Beat the cream cheese. In a large bowl, beat the softened cream cheese until completely smooth and fluffy, about 2 minutes.
Scrape the bowl well.
- Add sweetness and flavor. Beat in powdered sugar, vanilla, and almond extract until smooth and silky. Scrape the bowl again.
- Whip the cream. In a separate, cold bowl, whip the heavy cream to stiff peaks. Do not overbeat.
You want a sturdy, cloud-like texture.
- Lighten the filling. Gently fold the whipped cream into the cream cheese mixture in two additions. Use a spatula and light strokes to keep it airy.
- Fold in the cakes. Stir in the chopped Christmas Tree Cakes until evenly distributed. Don’t overmix; you want small chunks throughout for texture.
- Layer it up. Spread half the filling over the crust.
Add a layer of whole or halved Christmas Tree Cakes, fitting them snugly. Top with the remaining filling and smooth the surface.
- Chill to set. Cover and refrigerate for at least 6 hours, preferably overnight. The longer chill helps the cheesecake slice cleanly.
- Garnish. Run a thin knife around the pan and release the springform.
Top with extra Christmas Tree Cakes, piped whipped cream, and a dusting of green sugar or red gel accents for a festive finish.
- Slice and serve. Use a warm, dry knife for neat slices. Wipe between cuts for the cleanest look.
Storage Instructions
- Refrigerator: Keep the cheesecake covered and chilled for up to 4 days. The snack cakes on top will soften over time but still taste great.
- Freezer: Freeze whole or in slices for up to 1 month.
Wrap tightly in plastic and foil. Thaw overnight in the fridge before serving.
- Make-ahead tip: Assemble a day ahead for the best set and easiest slicing.

Benefits of This Recipe
- No-bake convenience: You skip the oven and avoid cracks, water baths, and guesswork.
- Nostalgic flavor: The Christmas Tree Cakes bring familiar vanilla, frosting, and sprinkles to each bite.
- Easy to decorate: Built-in holiday vibes mean minimal effort for maximum effect.
- Flexible ingredients: Swap cookies for the crust, adjust sweetness, and customize toppings without stress.
- Crowd-friendly: Slices neatly, travels well, and delights both kids and adults.
What Not to Do
- Don’t skip room temperature cream cheese. Cold cream cheese stays lumpy and won’t blend smoothly.
- Don’t overwhip the cream. Grainy or separated cream ruins the texture. Stop at stiff peaks.
- Don’t rush the chill. If you cut too soon, the cheesecake will slump and smear.
- Don’t pack in too many cake chunks. Too many mix-ins can prevent a clean set and make slicing messy.
- Don’t use a warm crust. Let the crust chill so the filling sets firmly on top.
Variations You Can Try
- Chocolate crust: Use chocolate wafer cookies or Oreos for a vanilla-chocolate contrast.
- Peppermint twist: Add 1/4 teaspoon peppermint extract to the filling and sprinkle crushed candy canes on top.
- Strawberry swirl: Spoon small dollops of strawberry jam over the top layer and swirl with a toothpick before chilling.
- Cinnamon-spice version: Mix 1/2 teaspoon cinnamon into the crust and a pinch of nutmeg into the filling.
- Mini cheesecakes: Use a muffin tin lined with cupcake papers.
Press in mini crusts, pipe in filling, and top each with a small cake piece.
- Extra-firm set: Bloom 1 teaspoon powdered gelatin in 2 tablespoons cold water, melt gently, and whisk into the cream cheese mixture before folding in the whipped cream.
FAQ
Your Next Favorite Dessert Is Inside
SEND ME THE FREE DESSERTS
Do I Have to Use a Springform Pan?
No, but it’s the easiest for clean edges. You can use a deep pie dish or a square 8-inch pan lined with parchment, then lift and slice.
Can I Use Store-Brand Snack Cakes Instead?
Yes. Flavor and texture may vary slightly, but any similar vanilla snack cake with frosting works well.
How Do I Keep the Cheesecake from Tasting Too Sweet?
Use a slightly salty crust, stick to 3/4 cup powdered sugar, and top with unsweetened whipped cream.
A chocolate crust can also balance the sweetness.
What If I Don’t Have a Mixer?
Use a sturdy whisk for the cream cheese and a hand whisk for the cream, but it will take more time. Chill the bowl and cream for faster whipping.
Can I Add More Cakes to the Filling?
You can, but keep the chunks small and limit to about 1 extra cake. Too many pieces make the filling unstable.
How Long Should I Chill It?
At least 6 hours, but 8–12 hours is ideal.
Overnight is best for clean slices and a fully set texture.
What’s the Best Way to Slice It Neatly?
Use a long, sharp knife dipped in hot water and wiped dry between cuts. This melts through frosting and keeps edges clean.
Can I Make It Gluten-Free?
Use gluten-free cookies for the crust and check the snack cakes for gluten content. If you can’t find GF Christmas Tree Cakes, use a similar GF snack cake.
Will It Hold Up at Room Temperature?
It’s fine on a dessert table for about 1–2 hours.
After that, return it to the fridge to keep the texture firm and safe.
Can I Reduce the Filling to Fit a Smaller Pan?
Yes. For an 8-inch pan, reduce the crust by 20% and the filling by about 15–20%. Keep the chill time the same.
Wrapping Up
Little Debbie Christmas Tree Cake Cheesecake is all about fun, flavor, and ease.
It looks festive, tastes nostalgic, and doesn’t demand oven time or advanced skills. Make it a day ahead, top it with extra trees, and watch it disappear slice by slice. It might just become your new holiday tradition.
Printable Recipe Card
Want just the essential recipe details without scrolling through the article? Get our printable recipe card with just the ingredients and instructions.
Save Room for Something Sweet
Before you go, grab five irresistible dessert recipes that are simple to follow, satisfying to make and perfect for sharing.