Red Velvet Cream Cheese Stuffed Cookies – Soft, Velvety, and Irresistible
Red velvet and cream cheese are a classic pair, and these stuffed cookies deliver that bakery-style flavor in a soft, gooey package. Each bite has a rich cocoa base, notes of vanilla, and a creamy, tangy center. They look impressive but are easy to pull off at home.
5 Irresistible Desserts, Completely Free
Get five easy dessert recipes you’ll want to save, share, and make again and again—delivered straight to your inbox.
No special equipment needed—just a mixing bowl, a baking sheet, and a little patience while the dough chills. If you love red velvet cake, this cookie version might become your new favorite.

Ingredients
Method
- Make the filling: In a bowl, beat the cream cheese, powdered sugar, a pinch of salt, and 1/2 teaspoon vanilla until smooth and thick. Scoop 12 heaping teaspoon-sized mounds onto a parchment-lined plate. Freeze for 25–30 minutes until firm but not rock hard.
- Cream the butter and sugars: In a large bowl, beat softened butter with granulated and brown sugar for 2–3 minutes until light and fluffy.
- Add wet ingredients: Beat in the egg, remaining 1 1/2 teaspoons vanilla, and red gel coloring. Start with 1 teaspoon red gel and add more until you get a deep red. Scrape the bowl.
- Whisk dry ingredients: In a separate bowl, whisk flour, cocoa powder, cornstarch, baking soda, and salt.
- Combine: Add dry ingredients to the wet mixture and mix on low just until no dry streaks remain. If using, fold in white chocolate chips.
- Chill the dough: Cover and refrigerate for 30–45 minutes. This firms the dough so it’s easier to shape and helps prevent spreading.
- Preheat and prep: Heat oven to 350°F (175°C). Line two baking sheets with parchment.
- Portion the dough: Scoop 12 equal portions (about 2 tablespoons each). Flatten each portion into a thick disc about 2 1/2 inches wide.
- Stuff and seal: Place one frozen cream cheese mound in the center of a dough disc. Wrap the dough around it, pinching seams to seal. Roll gently into a ball and place seam-side down on the tray, spaced 2 inches apart.
- Bake: Bake 10–12 minutes, until the edges are set and the tops look slightly matte but the centers are soft. Do not overbake—carryover heat will finish the centers.
- Cool: Let cookies cool on the sheet for 10 minutes, then transfer to a rack. The filling sets as they cool, giving that creamy pocket inside.
- Optional finish: Drizzle with melted white chocolate or dust lightly with powdered sugar once fully cooled.
Why This Recipe Works
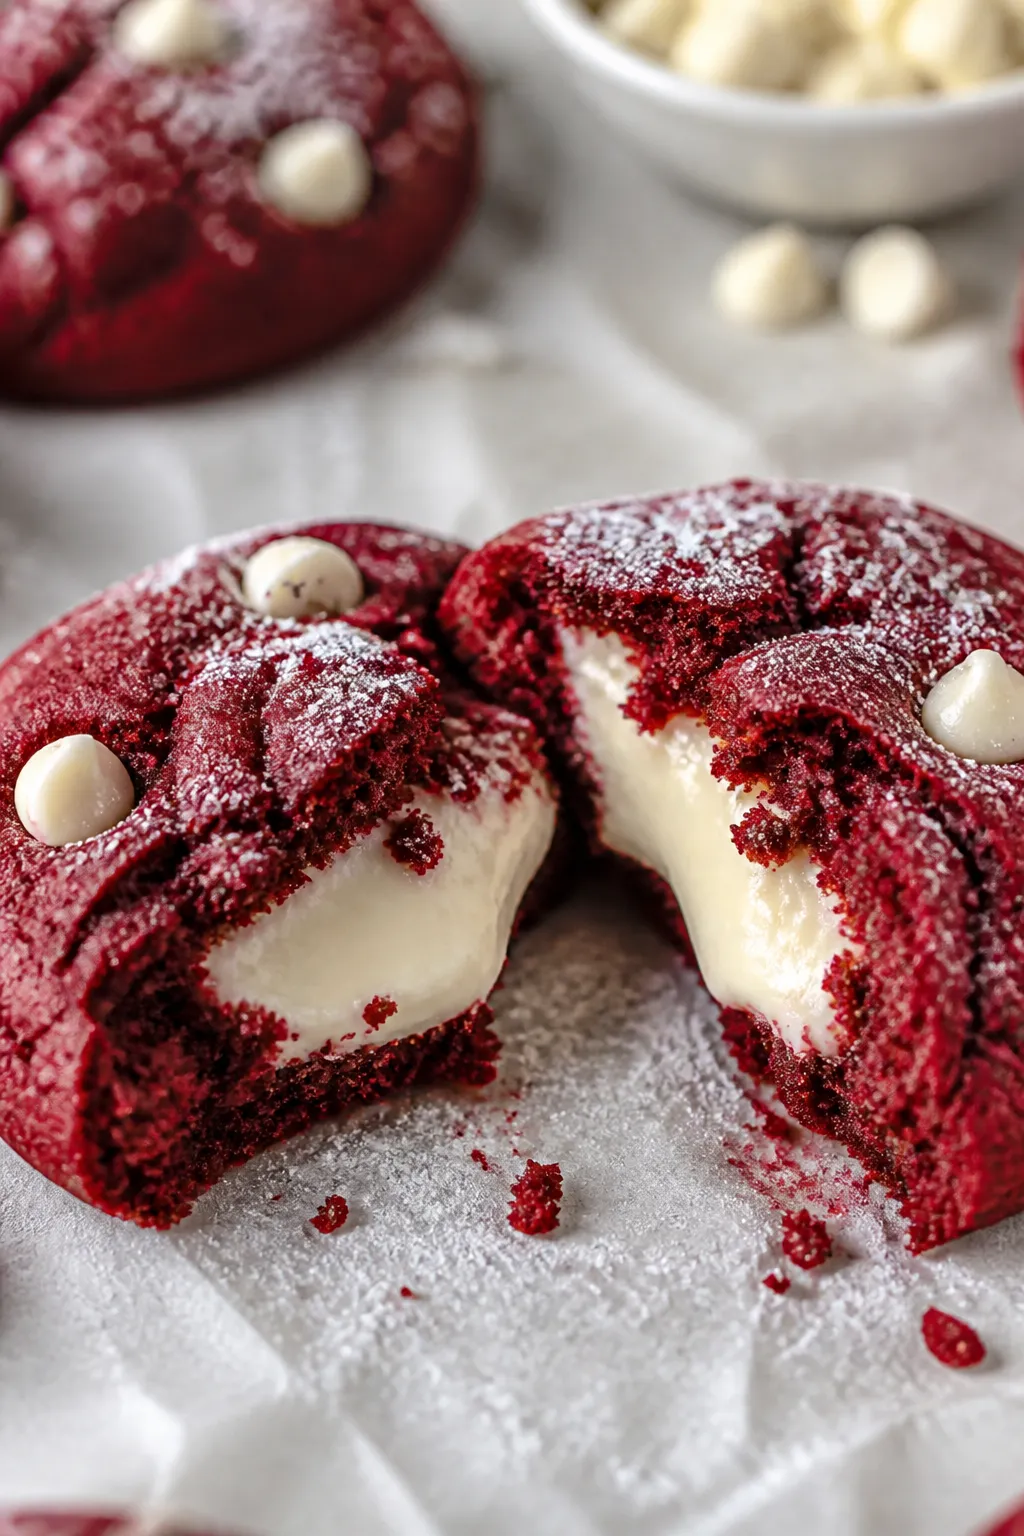
These cookies balance flavor and texture the way red velvet should. A touch of cocoa powder gives depth without overpowering the vanilla.
Cornstarch in the dough keeps the cookies soft and thick, while brown sugar adds moisture and chew.
The cream cheese filling is lightly sweetened, so it melts into a silky center instead of tasting like frosting. Chilling the dough and the filling separately makes shaping easier and prevents spreading. The result is a bakery-quality cookie with a bold color, neat edges, and a melt-in-your-mouth middle.
Shopping List
- Unsalted butter (1/2 cup, softened)
- Granulated sugar (1/2 cup)
- Light brown sugar (1/2 cup, packed)
- Large egg (1)
- Vanilla extract (2 teaspoons)
- Red gel food coloring (1–2 teaspoons; gel gives the best color)
- All-purpose flour (1 3/4 cups)
- Unsweetened cocoa powder (2 tablespoons)
- Cornstarch (1 tablespoon)
- Baking soda (1/2 teaspoon)
- Fine salt (1/2 teaspoon)
- Cream cheese (6 ounces, softened)
- Powdered sugar (1/3 cup)
- A pinch of salt for the filling
- Optional: white chocolate chips (1/2 cup) for the dough or for drizzling
Instructions

- Make the filling: In a bowl, beat the cream cheese, powdered sugar, a pinch of salt, and 1/2 teaspoon vanilla until smooth and thick.
Scoop 12 heaping teaspoon-sized mounds onto a parchment-lined plate. Freeze for 25–30 minutes until firm but not rock hard.
- Cream the butter and sugars: In a large bowl, beat softened butter with granulated and brown sugar for 2–3 minutes until light and fluffy.
- Add wet ingredients: Beat in the egg, remaining 1 1/2 teaspoons vanilla, and red gel coloring. Start with 1 teaspoon red gel and add more until you get a deep red.
Scrape the bowl.
- Whisk dry ingredients: In a separate bowl, whisk flour, cocoa powder, cornstarch, baking soda, and salt.
- Combine: Add dry ingredients to the wet mixture and mix on low just until no dry streaks remain. If using, fold in white chocolate chips.
- Chill the dough: Cover and refrigerate for 30–45 minutes. This firms the dough so it’s easier to shape and helps prevent spreading.
- Preheat and prep: Heat oven to 350°F (175°C).
Line two baking sheets with parchment.
- Portion the dough: Scoop 12 equal portions (about 2 tablespoons each). Flatten each portion into a thick disc about 2 1/2 inches wide.
- Stuff and seal: Place one frozen cream cheese mound in the center of a dough disc. Wrap the dough around it, pinching seams to seal.
Roll gently into a ball and place seam-side down on the tray, spaced 2 inches apart.
- Bake: Bake 10–12 minutes, until the edges are set and the tops look slightly matte but the centers are soft. Do not overbake—carryover heat will finish the centers.
- Cool: Let cookies cool on the sheet for 10 minutes, then transfer to a rack. The filling sets as they cool, giving that creamy pocket inside.
- Optional finish: Drizzle with melted white chocolate or dust lightly with powdered sugar once fully cooled.
Keeping It Fresh
These cookies keep well because the center stays moist.
Store in an airtight container at room temperature for up to 2 days. For longer storage, refrigerate for up to 5 days. The chill won’t hurt the texture.
To freeze, place baked cookies in a single layer until solid, then transfer to a freezer bag for up to 2 months.
Thaw at room temperature or warm in a 300°F (150°C) oven for 5–7 minutes. You can also freeze the stuffed dough balls and bake from frozen, adding 1–2 extra minutes.

Why This is Good for You
- Portion control built in: Each cookie is rich and satisfying, so one really hits the spot.
- Less frosting, more balance: The lightly sweetened cream cheese gives creaminess without the sugar load of traditional buttercream.
- Real cocoa flavor: A modest amount of cocoa adds antioxidants and a deeper chocolate note without making the cookie heavy.
- Homemade advantage: You control the ingredients—no artificial flavors, and you can adjust sugar or swap in organic items if you prefer.
What Not to Do
- Don’t skip chilling: Warm dough will spread and expose the filling. Chilling keeps the shape tidy.
- Don’t overbake: If you wait for full browning, they’ll turn dry.
Pull them when edges set and centers look soft.
- Don’t use liquid food coloring: It can water down the dough. Gel gives vibrant color with minimal moisture.
- Don’t forget to seal: Any gap in the dough can cause the filling to leak. Pinch seams well.
- Don’t overfill: A teaspoon-sized mound is enough.
Too much filling will burst out during baking.
Alternatives
- Gluten-free: Use a 1:1 gluten-free baking flour with xanthan gum. Chill a bit longer, as GF dough can be softer.
- Lower sugar: Reduce granulated sugar by 2 tablespoons and powdered sugar in the filling by 1 tablespoon. Texture stays tender.
- Flavor twists: Add 1/2 teaspoon almond extract to the dough for a bakery-style aroma, or a pinch of espresso powder to boost cocoa notes.
- Chocolate dip: Half-dip cooled cookies in melted white chocolate and sprinkle with crushed freeze-dried raspberries.
- Color swap: Skip the red and make “velvet” cream cheese cookies by leaving them natural, or use a few drops of burgundy gel for a deeper tone.
- Mini size: Make 18 smaller cookies with 1 tablespoon dough and 1/2 teaspoon filling; bake 8–9 minutes.
Your Next Favorite Dessert Is Inside
SEND ME THE FREE DESSERTS
FAQ
Can I make the dough ahead of time?
Yes.
Chill the dough up to 48 hours, or freeze stuffed dough balls for up to 2 months. Bake straight from frozen and add 1–2 minutes to the bake time.
What if I only have liquid food coloring?
Use it sparingly and add 1–2 extra teaspoons of flour if the dough feels sticky. The color will be lighter, but the cookies will still taste great.
How do I know when they’re done?
The edges should look set, and the tops should lose their glossy shine but still look soft.
If the centers puff and then slightly settle as they cool, you nailed it.
Can I use block cream cheese or the tub kind?
Use block cream cheese for the best texture. The tub often has more moisture and can make the filling too soft.
Why did my filling leak out?
Either the dough wasn’t sealed well or it was too warm. Make sure the filling is chilled, pinch seams closed, and chill the assembled cookies for 10 minutes before baking if your kitchen is warm.
Can I add chocolate chips?
Absolutely.
White chocolate chips pair especially well with red velvet, but semisweet or dark work too. Keep it to about 1/2 cup so the dough still seals easily.
Do I need a stand mixer?
No. A hand mixer works well, and you can even mix by hand with a sturdy spatula.
Just cream the butter and sugars thoroughly to get that soft texture.
How do I prevent dry cookies?
Measure flour by spooning and leveling, don’t pack it in. Also, watch the bake time closely and pull them while slightly underdone in the center.
Wrapping Up
Red Velvet Cream Cheese Stuffed Cookies bring classic cake flavor to a handheld treat with a creamy surprise inside. They’re simple to make, look special, and disappear fast at parties.
With a little chilling and careful sealing, you’ll get picture-perfect cookies every time. Keep a batch of dough balls in the freezer, and fresh-baked red velvet can be just minutes away whenever the craving hits.
Printable Recipe Card
Want just the essential recipe details without scrolling through the article? Get our printable recipe card with just the ingredients and instructions.
Save Room for Something Sweet
Before you go, grab five irresistible dessert recipes that are simple to follow, satisfying to make and perfect for sharing.